Hi all, I just bought a new VPS from Vultr.com, maybe one of the best VPS server provider in this world, and after desperately searching for online tutorials as well as making changes to the config files back and forth, finally I managed to get this all done. And I'd like to share my experience with you!
Prerequisites
First of course you need a nice hostname and a VPS to DNS to. I usually choose a domain from GoDaddy for its affordable price and convenient DNS setting on the website. If this is your personal website, then don't worry about the extra option like private information which will cost you extra money, just stick with the original price and pay.
After you pay, then you need to buy a VPS with a IP to DNS the hostname. Vultr.com gives you a lot of VPS options as well as payment methods. I used paypall to add credit and was given extra 25 credit to use in 1 year, that's amazing!
Vultr VC2: If you are first time user, I suggest you choose the basic
1. Server Location: Los Angeles (said to be faster)
2. Server Type: Ubuntu 16.04 x64
3. Server Size: 20GB SSD 3.50/month (you don't want to choose the IPv6 only because it limits your website visit eventually)
4. Additional Features: Enable IPv6, Enable Auto Backups
5. Skip all others and Deploy Now
Now you can see a server instance running:

Click on the View Console and a window will pop up as a terminal.
login: root
Password: [click on the OS icon (shown in above image), and the initial password can be found at the first column]
After login, change the password immediately.
sudo passwd
[Enter your new password]
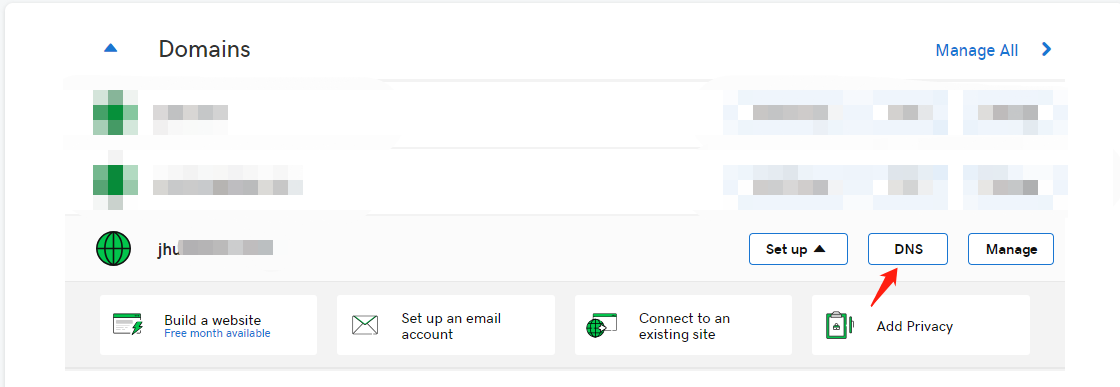
Now conver to GoDaddy, click DNS:
Then change and add setting accordingly, value = Your VPS IP:
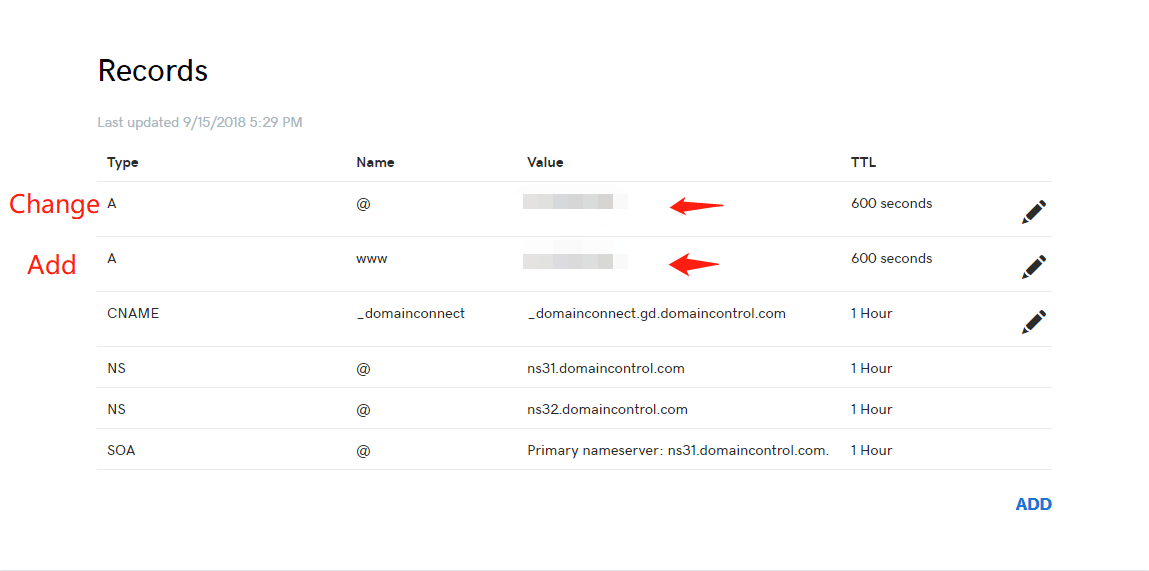
Wait for a few miniute and it'll automatically match the VPS ip with the hostname.
WordPress Installation
I will just stick with this tutorial. Huge thanks to TechRepublic!
Update library and instlal LAMP server. During the installation, you may be prompted to create and verify a password for the MySQL administrator.
sudo apt-get update && apt-get upgrade
sudo apt-get install lamp-server^
sudo apt-get install php7.0 php7.0-mysql libapache2-mod-php7.0 php7.0-cli php7.0-cgi php7.0-gd
Now open the MySQL you administered and create MySQL database for WordPress:
- USERNAME = your username here (normally is root)
- localhost (don't change this)
- ADMIN_PASSWORD = your MySQL password
CREATE DATABASE wpdb;
GRANT ALL PRIVILEGES ON wpdb.* TO 'USERNAME'@'localhost' IDENTIFIED BY 'ADMIN_PASSWORD';
FLUSH PRIVILEGES;
EXIT;
Download WordPress zip file and unzip.
wget -c http://wordpress.org/latest.tar.gz
tar -xzvf latest.tar.gz
Now comes the part where mine is different with the referred tutorial...
cd /var/www/html
# remove all apache2 index files
rm *

cd - # return to wordpress download folder
# and move all the files (not the wordpress folder) under the html folder
sudo mv wordpress/* /var/www/html
ls -a # check for hidden files, move them to the same destination folder
Give the wordpress folder the proper permissions with the commands:
sudo chown -R www-data:www-data /var/www/html/
sudo chmod -R 755 /var/www/html/
# rename the WordPress configuration file and modify it to fit our setup
cd /var/www/html/
sudo mv wp-config-sample.php wp-config.php
vim wp-config.php
# remember to type i for inserting!
Borrow this figure from this tutorial

You only need to change database_name_here, username_here, password_here, similar things as above.
Change php.ini
By default, wordpress is OK with the default php settings, but for future consideration, you'd better change settings before restarting the service.
cd /etc/php/7.0/apache2/
vim php.ini
Now you're in vim editor, you want to locate these settings and change them according:
# search for words in vim
?max_input_vars
# enter i for insertion, set as follow:
max_input_vars = 1800

# do the same for others
max_execution_time = 200
post_max_size = 40M
upload_max_filesize = 40M
max_file_uploads = 100
Also there are some packages needed for advanced WordPress theme such as Avada, we'll just install them first.
sudo apt-get install php7.0-zip
sudo apt-get install php7.0-xml
Restart Service
sudo systemctl restart apache2.service
sudo systemctl restart mysql.service
Enjoy WordPress!
Open your web browswer and enter http://yourhostname/, now you just need to focus on the backstage of the wordpress! Happy Blogging!
PS
Oh I almost forget one thing! Remember how we change the ownership for /var/www/html/? If you'd like to upload your theme files to the wp-content/theme folder using FileZilla or some upload tools, then you would have to redo these codes again.
sudo chown -R www-data:www-data /var/www/html/
sudo chmod -R 755 /var/www/html/
This is actually how I solved not being able to update my theme due to ownership.
嘻嘻。
嘿嘿。